Interactive Computing with OnDemand
Make sure you are connected to VPN
Similar to ssh access, OnDemand requires your device to be on Oxford VPN, MSD VPN, or eduroam (no VPN needed if already on eduroam WiFi)
To log in to OnDemand, enter your BMRC user name and then your BMRC password immediately followed by 6-digit second authentication factor in the same password field.
ondemand00.bmrc.ox.ac.uk
OnDemand Apps
![]()
Prerequisites
Before launching the Jupyter app, ensure you have:
1. A Python virtual environment set up — see Creating a Python virtual environment
2. At least one Jupyter kernel registered, either:
- Using kir-add-kernel (available with the JupyterLab/4.5.6> module) — see Registering a kernel with kir-add-kernel
- Or manually — see Manually registering a Jupyter kernel
Step 1 — Create your jupyter.sh setup script
The app requires a shell script that prepares your Jupyter environment before the session starts.
This script must load any required modules and/or activate your Python virtual environment
Create a file called jupyter.sh in your home (easier to call it from home) directory:
Then edit it to match your setup. Choose one of the following approaches:
Use this if you are relying on kernels registered via kir-add-kernel and do not need to
activate a specific virtual environment for the Jupyter process itself:
Step 2 — Fill in the launch form
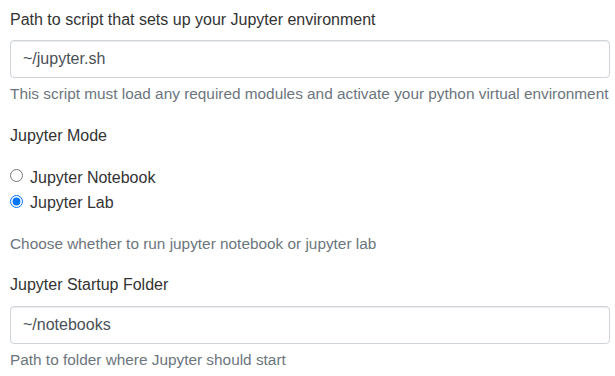
Path to script that sets up your Jupyter environment
Enter the path to the jupyter.sh script you created above:
Jupyter Mode
Select either Jupyter Notebook or JupyterLab depending on your preference. JupyterLab is recommended for most users as it provides a more fully featured interface.
Jupyter Startup Folder
This is the directory that Jupyter will open in, and it also acts as the root of the file browser within your session. You will not be able to navigate above this folder from within Jupyter. For an example,
Choose your startup folder carefully
Set this to the top-level directory that contains your project files. For example, if your work
lives under /well/<group>/users/$USER/, setting the startup folder to that path means you can
browse your full project structure from within Jupyter without having to navigate around it.
Prerequisites
Prior to launching RStudio-server via OnDemand, make sure to setup your ~/.Rprofile according to these
instructions
There are three RStudio apps in the OnDemand dashboard. Please choose the one with the custom logo below; the other two are legacy and support only up to R/4.3*
![]()
![]()
The Code Server app launches a VS Code environment running directly on a BMRC compute node, accessible from your browser — no local VS Code installation required.
How this differs from the VS Code Remote extension
If you have used the VS Code Remote - SSH extension from your local machine, the experience will feel familiar, but there is an important distinction:
- Remote - SSH runs VS Code locally and tunnels into the cluster over SSH. Your local machine handles the interface; the cluster handles computation.
- Code Server runs VS Code entirely on the cluster, served through your browser. There is no dependency on your local VS Code installation or SSH tunnel — the session is managed by OpenOnDemand like any other job.
Installing extensions
Because the Code Server session runs on a compute node with no internet access, you cannot install extensions directly from the marketplace in the usual way.
You can still install extensions manually by downloading the .vsix file from outside the cluster
and installing it via the command line:
- Download the
.vsixfile for your extension from the VS Code Marketplace on your local machine - Transfer it to BMRC (e.g. via
scpor the OOD file browser) - Install it with:
The extension will then be available the next time you launch a Code Server session.
![]()
The Virtual Desktop app launches a full graphical desktop environment on a BMRC compute node, accessible directly from your browser. No SSH tunnelling or local X11 setup required.
This is useful when you need to:
- Run applications with a graphical user interface (GUI), such as IGV, QuPath, or data interactively using tools that don't work well in a notebook environment
- Use desktop-based workflow tools or file managers on the cluster
The launch form lets you select your partition, number of CPUs, memory, and walltime — fill these in as you would for any other Slurm job.
Troubleshooting
RStudio stuck on grey screen after connecting
If you click Connect on an RStudio OnDemand session but are greeted with a persistent grey screen, the previous session likely saved a large object to its workspace and RStudio is attempting to restore it on launch — which can stall or hang indefinitely.
Fix: Delete the active session state to clear the saved workspace:
warning
This will discard any unsaved objects from your previous R session. Scripts and files on disk are unaffected.